It has happened to all of us. You get into a habit and accept a few inconveniences and move on. It bothers you, but you procrastinate, putting it in the backburner by slapping that mental TODO note. Yet surprisingly, sometimes the solution is right in front of you.
Take my case. I have always done _ "github.com/lib/pq" in my code to use the postgres driver. The _ is to register the driver with the standard library interface. Since we usually do not actually use the pq library, one needs to use a _ to import the library without exposing the package in the code. Life went on and I didn’t even bother to look for better ways to do things. Until the time came and I screamed “There has to be a better way !”.
Indeed there was. It was the actual pq package, which I was already using but never actually imported ! Yes, I am shaking my head too . Stupidly, I had always looked at database/sql and never bothered to look at the underlying lib/pq package. Oh well, dumb mistakes are bound to happen. I learn from them and move on.
Let’s take a look at some of the goodies that I found inside the package, and how it made my postgres queries look much leaner and elegant.
Believe it or not, for the longest time, I did this to scan a postgres array -
id:=1varrawCommentsstringerr:=db.QueryRow(`SELECT comments from users WHERE id=$1`,id).Scan(&rawComments)iferr!=nil{returnerr}comments:=strings.Split(rawComments[1:len(rawComments)-1],",")log.Println(id,comments)
It was ugly. But life has deadlines and I moved on. Here is the better way -
varcomments[]stringerr:=db.QueryRow(`SELECT comments from users WHERE id=$1`,id).Scan(pq.Array(&comments))iferr!=nil{returnerr}log.Println(id,comments)
Similarly, to insert a row with an array -
id:=3comments:=[]string{"marvel","dc"}_,err:=db.Exec(`INSERT INTO users VALUES ($1, $2)`,id,pq.Array(comments))iferr!=nil{returnerr}
Now if you have an entry where ts is NULL, it is extremely painful to scan it in one shot. You can use coalesce or a CTE or something of that sort. This is how I would have done it earlier -
id:=1vartstime.Timeerr:=db.QueryRow(`SELECT coalesce(ts, to_timestamp(0)) from last_updated WHERE id=$1`,id).Scan(&ts)iferr!=nil{returnerr}log.Println(id,ts,ts.IsZero())// ts.IsZero will still be false btw !
This is far better -
id:=1vartspq.NullTimeerr:=db.QueryRow(`SELECT ts from last_updated WHERE id=$1`,id).Scan(&ts)iferr!=nil{returnerr}ifts.Valid{// do something}log.Println(id,ts.Time,ts.Time.IsZero())// This is true !
Errors
Structured errors are great. But the only error type check that I used to have in my tests were for ErrNoRows since that is the only useful error type exported by the database/sql package. It frustrated me to no end. Because there are so many types of DB errors like syntax errors, constraint errors, not_null errors etc. Am I forced to do the dreadful string matching ?
I made the discovery when I learnt about the # format specifier. Doing a t.Logf("%+v", err) versus t.Logf("%#v", err) makes a world of a difference.
If you have a key constraint error, the first would print
pq: duplicate key value violates unique constraint "last_updated_pkey"
Recently, I had a requirement to shrink the disk space of a machine I had setup. We had overestimated and decided to use lesser space until the need arises. I had setup a 1TB disk initially and we wanted it to be 100GB.
I thought it would be as simple as detaching the volume, setting the new values and be done with it. Turns out you can increase the disk space, but not decrease it. Bummer, now I need to do the shrinking manually.
Note: This worked for me on an Ubuntu 16.04 OS. YMMV. Proceed with caution. Take a snapshot of your volume before you do anything.
Basic idea:
We have a 1TB filesystem. Our target is to make it 100GB.
AWS stores all your data in EBS (Elastic Block Storage) which allows detaching volumes from one machine and attaching to another. We will use this to our advantage. We will create a 100GB volume, attach this newly created volume and the original volume to a temporary machine. From inside the machine, we will copy over the data from the original to the new volume. Detach both volumes and attach this new volume to our original machine. Easy peasy.
Here we go !
Note the hostname of the current machine. It should be something like ip-a-b-c-d.
Shutdown the current machine. (Don’t forget to take the snapshot !).
Detach the volume, name it as original-volume to avoid confusion.
Create a new ec2 instance with the same OS as the current machine with 100GB of storage. Note, that it has to be in the same availability zone.
Shutdown that machine
Detach the volume from the machine, name it as new-volume to avoid confusion.
Now create another new ec2 machine, t2.micro is fine. Again, this has to be in the same availability zone.
Boot up the machine. Log in.
Attach original-volume to this machine at /dev/sdf which will become /dev/xvdf1.
Attach new-volume to this machine at /dev/sdg which will become /dev/xvdg1.
It will take some time to attach because the machines are running. Do NOT attach while the machine is shut down because it will take the original-volume to be the root partition and boot into it. We do not want that. (This happened to me).
We want the root partition to be the separate 8G disk of the t2.micro machine, and have 2 separate partitions to work with.
After the attachment is complete (you will see so in the aws ec2 console), do a lsblk. Check that you can see the partitions.
$lsblk
NAME MAJ:MIN RM SIZE RO TYPE MOUNTPOINT
xvda 202:0 0 8G 0 disk
└─xvda1 202:1 0 8G 0 part /
xvdf 202:80 0 1000G 0 disk --> original-volume
└─xvdf1 202:81 0 1000G 0 part
xvdg 202:96 0 100G 0 disk --> new-volume
└─xvdg1 202:97 0 100G 0 part
We are now all set to do the data transfer.
First, check filesystem integrity of the original volume.
ubuntu@ip-172-31-12-57:~$ sudo dd bs=16M if=/dev/xvdf1 of=/dev/xvdg1 count=355
355+0 records in
355+0 records out
5955911680 bytes (6.0 GB, 5.5 GiB) copied, 892.549 s, 6.7 MB/s
Double check that all changes are synced to disk.
ubuntu@ip-172-31-12-57:~$ sync
Resize the new volume.
ubuntu@ip-172-31-12-57:~$ sudo resize2fs -p /dev/xvdg1
resize2fs 1.42.13 (17-May-2015)
Resizing the filesystem on /dev/xvdg1 to 26214139 (4k) blocks.
The filesystem on /dev/xvdg1 is now 26214139 (4k) blocks long.
If you are using protocol buffers with Go and have reached a point where the serialization / deserialization has become a bottleneck in your application, fret not, you can still go faster with gogoprotobuf.
I wasn’t aware (until now !) of any such libraries which had perfect interoperability with the protocol buffer format, and still gave much better speed than using the usual protobuf Marshaler. I was so impressed after using the library that I had to blog about it.
The context of this began when some code of mine that used normal protobuf serialization started to show bottlenecks. The primary reason being the code was running on a raspberry pi with a single CPU. And the overall throughput that was desired was much lower than expected.
The concept of gogoproto was simple and appealing. They use custom extensions in the proto declaration which lead to better code generation tailor made for Go. Especially if you let go of some protocol buffer contracts like nullable, you can generate even faster code. In my case, all the fields of my message were required fields. So it seemed like something I could take advantage of.
My .proto declaration changed from
syntax="proto3";packagemypackage;// This is the message sent to the cloud servermessageClientMessage{stringfield1=1;stringfield2=2;int64timestamp=3;}
to this
syntax="proto2";packagemypackage;import"github.com/gogo/protobuf/gogoproto/gogo.proto";option(gogoproto.gostring_all)=true;option(gogoproto.goproto_stringer_all)=false;option(gogoproto.stringer_all)=true;option(gogoproto.marshaler_all)=true;option(gogoproto.sizer_all)=true;option(gogoproto.unmarshaler_all)=true;// For testsoption(gogoproto.testgen_all)=true;option(gogoproto.equal_all)=true;option(gogoproto.populate_all)=true;// This is the message sent to the cloud servermessageClientMessage{requiredstringfield1=1[(gogoproto.nullable)=false];requiredstringfield2=2[(gogoproto.nullable)=false];requiredint64timestamp=3[(gogoproto.nullable)=false];}
Yes, using gogoproto, you cannot use proto3 if you intend to share your protobuf definitions with languages which do not support proto2, like php. That’s because proto3 does not support extensions. There is an active issue open which discusses this in further detail.
To generate the .pb.go file is not immediately straightforward. You have to set the proper proto_path, which took me some time to figure out.
Alright, time for some actual benchmarks and see if I get my money’s worth.
funcBenchmarkProto(b*testing.B){msg:="randomstring"now:=time.Now().UTC().UnixNano()msg2:="anotherstring"// wrap the msg in protobufprotoMsg:=&ClientMessage{field1:msg,field2:msg2,timestamp:now,}forn:=0;n<b.N;n++{_,err:=proto.Marshal(protoMsg)iferr!=nil{b.Error(err)}}}
Improvements seen across the board
name old time/op new time/op delta
Proto-4 463ns ± 2% 101ns ± 1% -78.09% (p=0.008 n=5+5)
name old alloc/op new alloc/op delta
Proto-4 264B ± 0% 32B ± 0% -87.88% (p=0.008 n=5+5)
name old allocs/op new allocs/op delta
Proto-4 4.00 ± 0% 1.00 ± 0% -75.00% (p=0.008 n=5+5)
Sometimes, I randomly browse through Go source code just to look for any patterns or best practices. I was doing that recently with the log package when I came across an interesting observation that I wanted to share.
Any call to log.Print or log.Println or any of its sister functions is actually a wrapper around the equivalent S call from the fmt package. The final output of that is then passed to an Output function, which is actually responsible for writing out the string to the underlying writer.
Here is some code to better explain what I’m talking about -
// Print calls l.Output to print to the logger.// Arguments are handled in the manner of fmt.Print.func(l*Logger)Print(v...interface{}){l.Output(2,fmt.Sprint(v...))}// Println calls l.Output to print to the logger.// Arguments are handled in the manner of fmt.Println.func(l*Logger)Println(v...interface{}){l.Output(2,fmt.Sprintln(v...))}
This means that if I just have one string to print, I can directly call the Output function and bypass this entire Sprinting process.
Lets whip up some benchmarks and analyse exactly how much of an overhead is taken by the fmt call -
func BenchmarkLogger(b *testing.B) {
logger := log.New(ioutil.Discard, "[INFO] ", log.LstdFlags)
errmsg := "hi this is an error msg"
for n := 0; n < b.N; n++ {
logger.Println(errmsg)
}
}
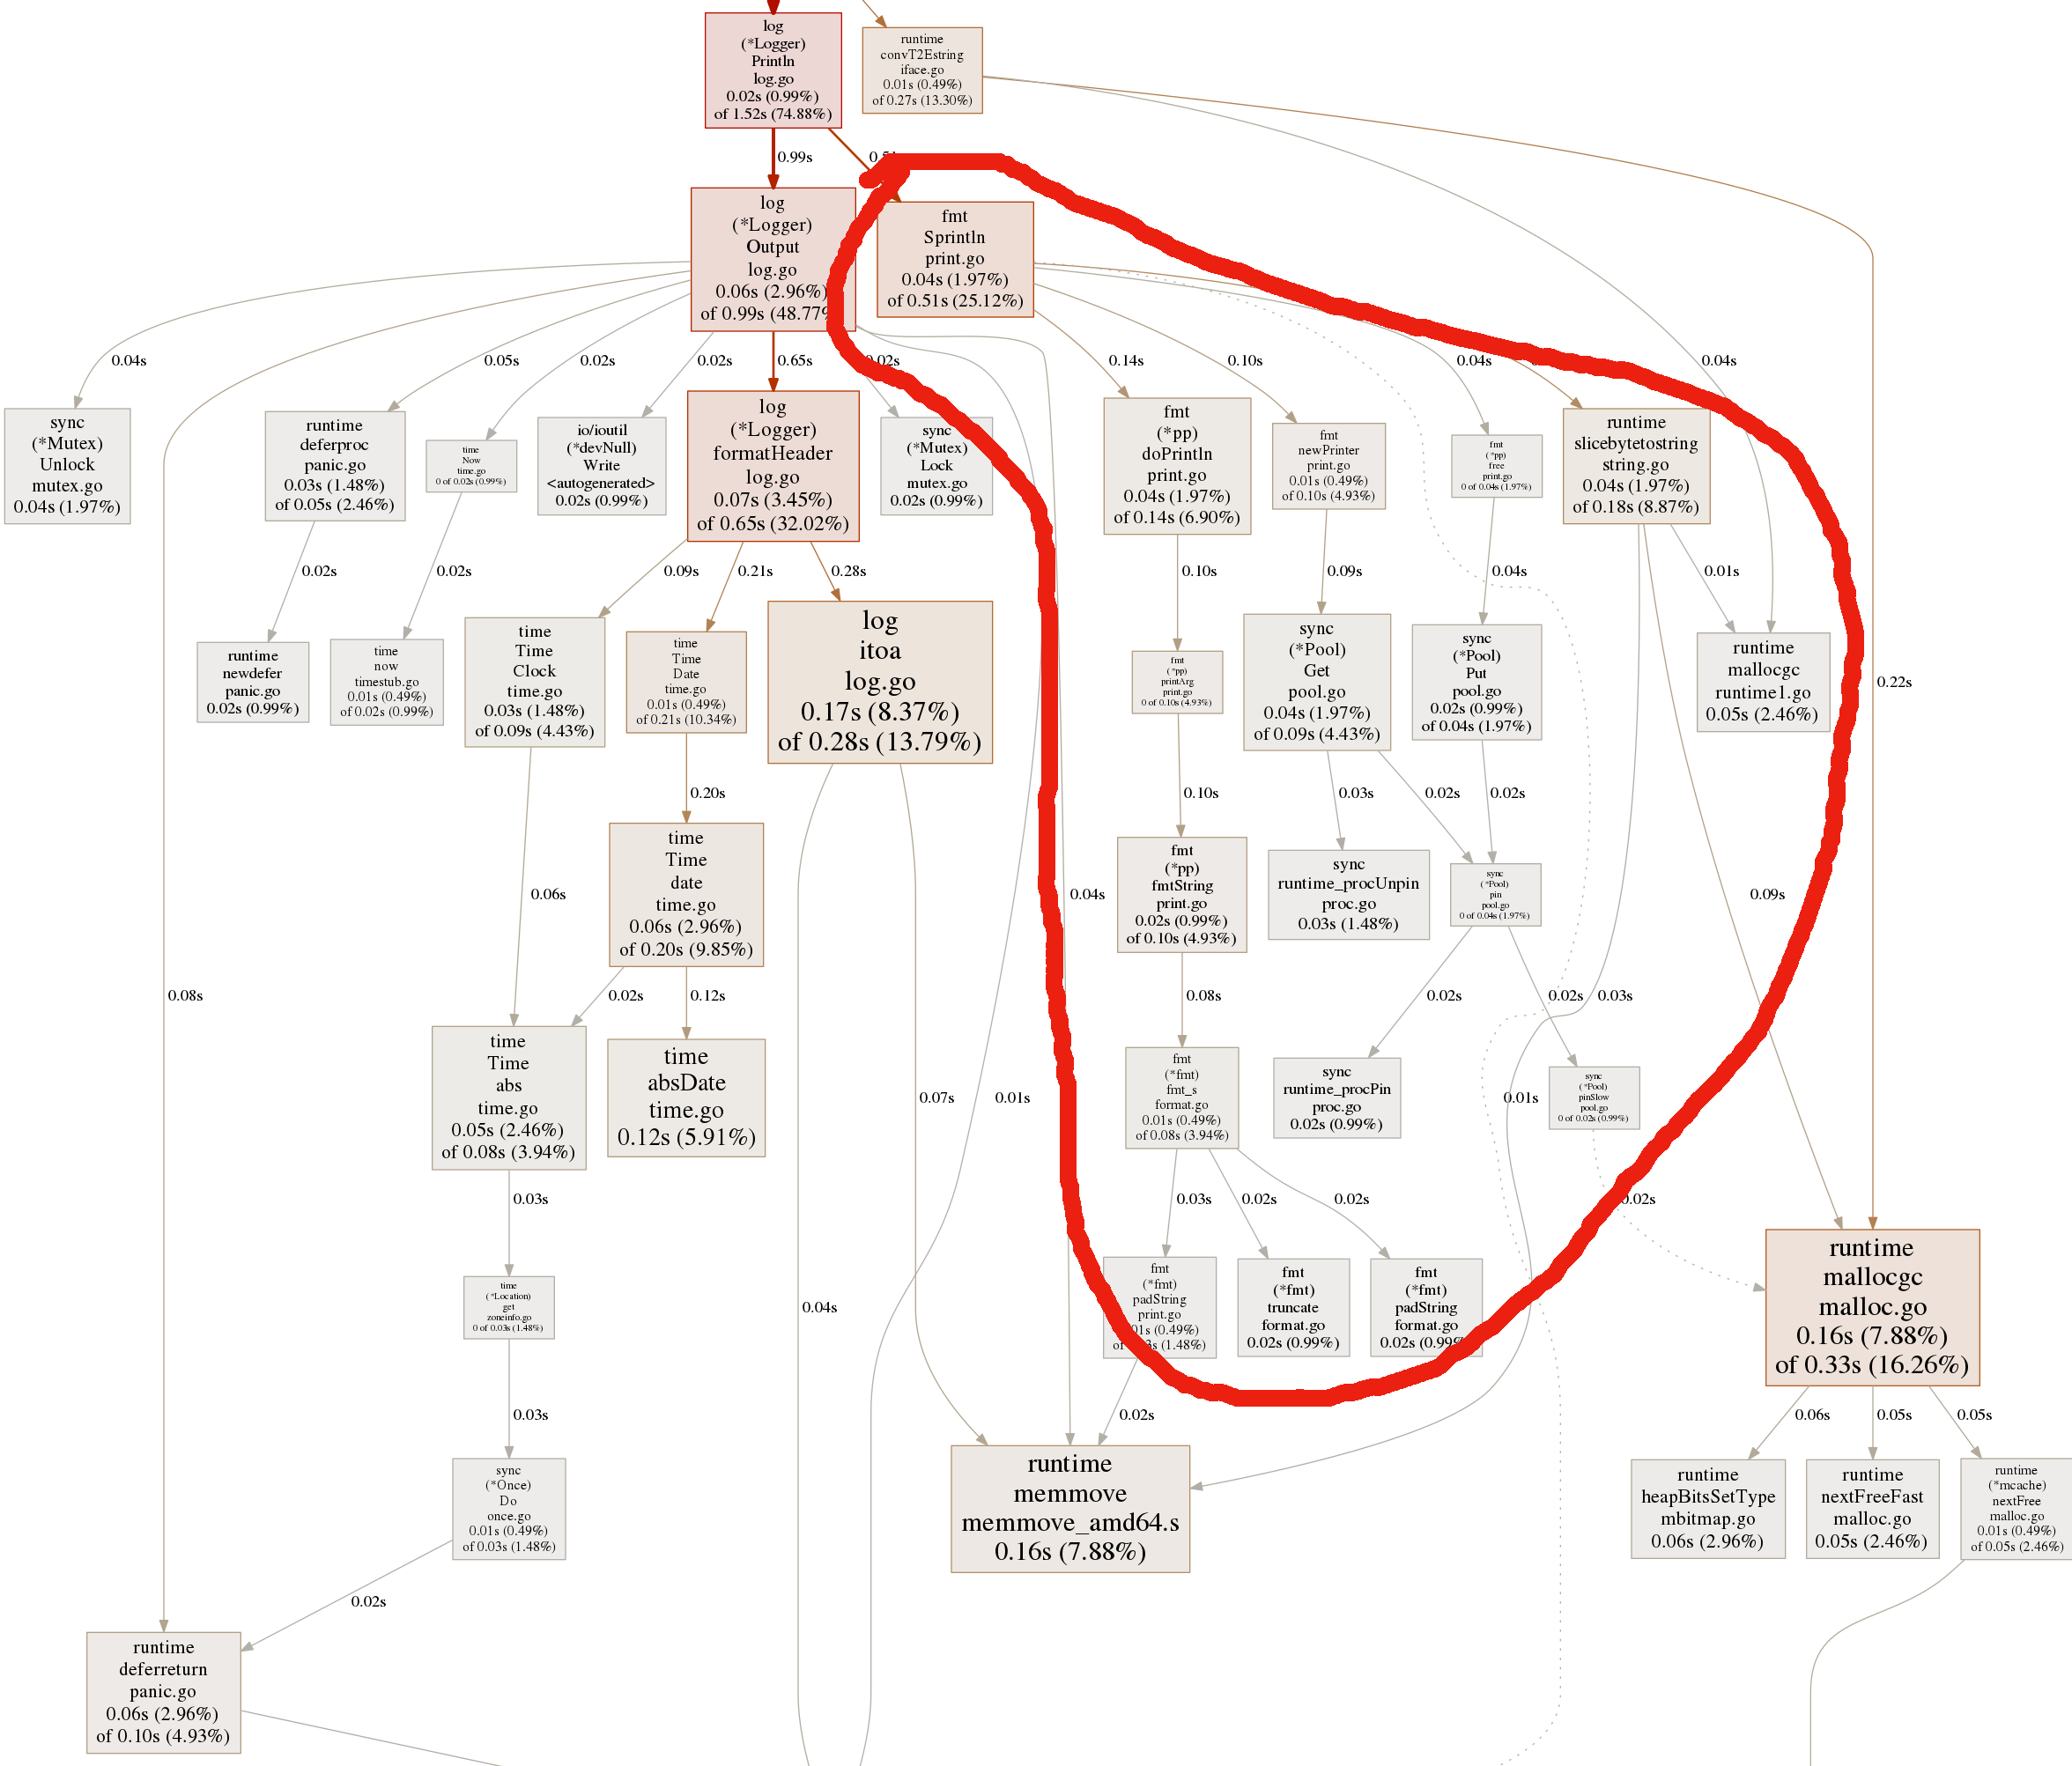
If we look into the cpu profile from this benchmark -
Its hard to figure out what’s going on. But the key takeaway here is that huge portion of the function calls circled in red is what’s happening from the Sprintln call. If you zoom in to the attached svg here, you can see lot of time being spent on getting and putting back the buffer to the pool and some more time being spent on formatting the string.
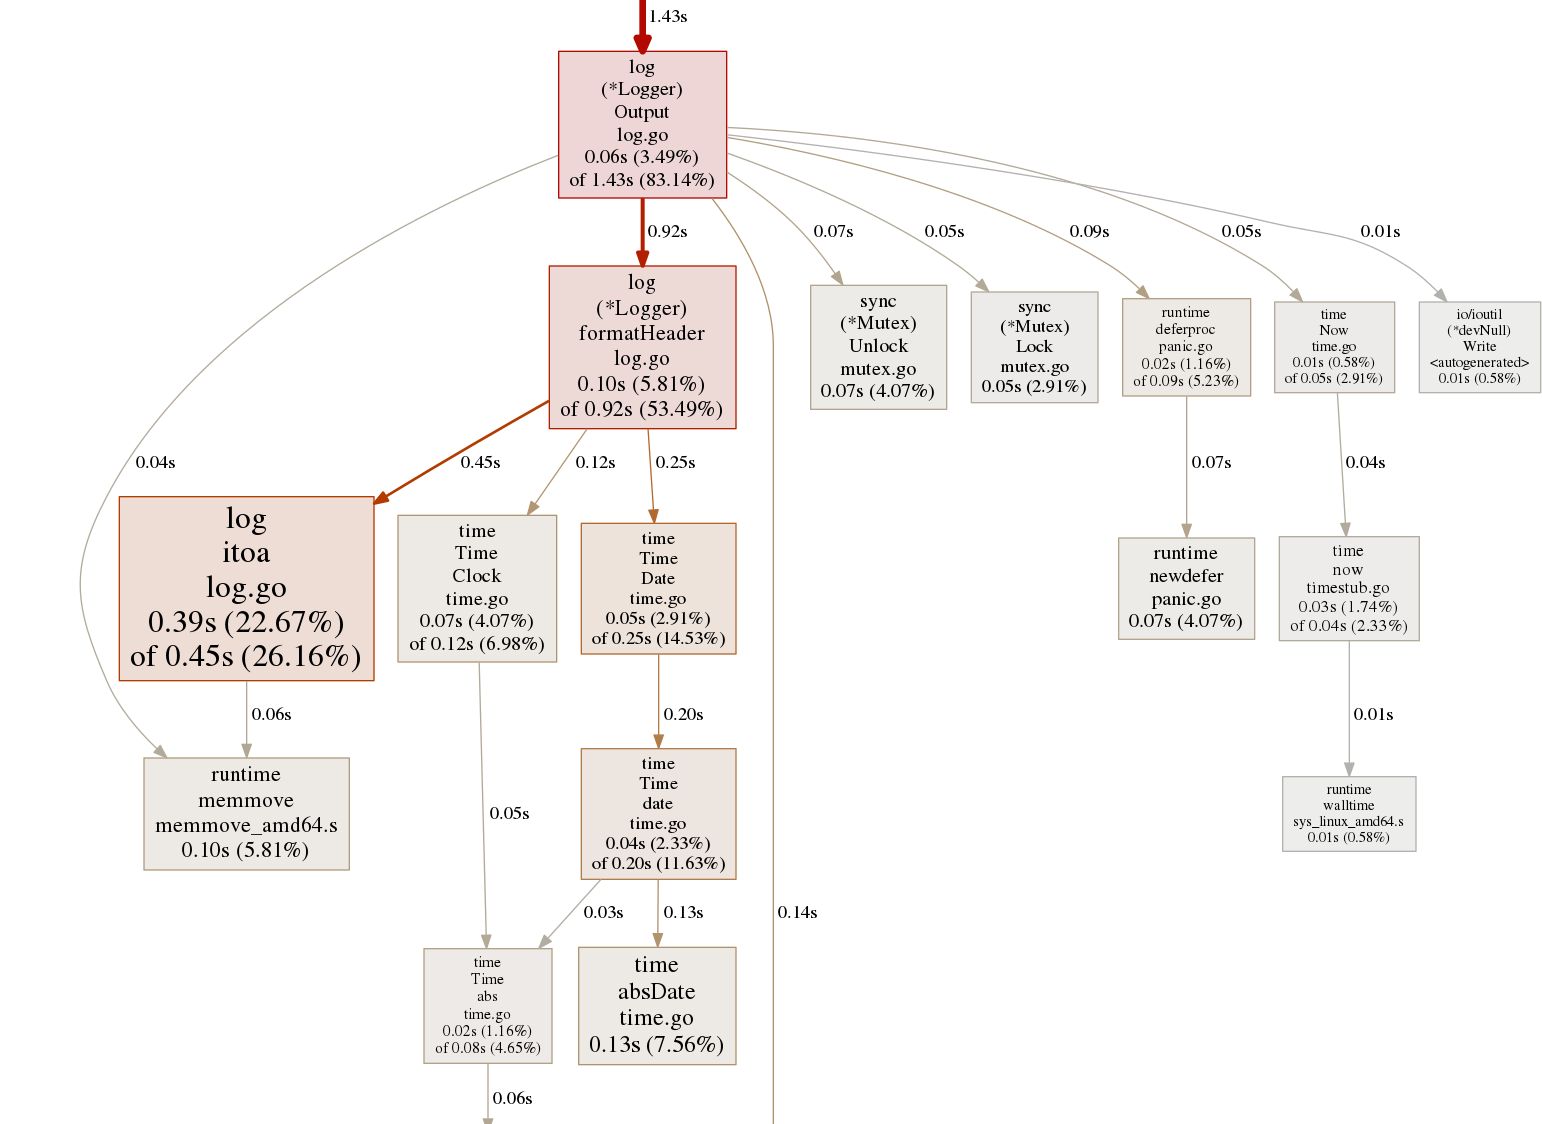
Now, if we compare this to a benchmark by directly calling the Output function -
func BenchmarkLogger(b *testing.B) {
logger := log.New(ioutil.Discard, "[INFO] ", log.LstdFlags)
errmsg := "hi this is an error msg"
for n := 0; n < b.N; n++ {
logger.Output(1, errmsg) // 1 is the call depth used to print the source file and line number
}
}
Bam. The entire portion due to the SPrintln call is gone.
Time to actually compare the 2 benchmarks and see how they perform.
funcBenchmarkLogger(b*testing.B){logger:=log.New(ioutil.Discard,"[INFO] ",log.LstdFlags)testData:=[]struct{teststringdatastring}{{"short-str","short string"},{"medium-str","this can be a medium sized string"},{"long-str","just to see how much difference a very long string makes"},}for_,item:=rangetestData{b.Run(item.test,func(b*testing.B){b.SetBytes(int64(len(item.data)))forn:=0;n<b.N;n++{// logger.Println(str) // Switched between these lines to comparelogger.Output(1,item.data)}})}}
More or less what was expected. It removes the allocations entirely by bypassing the fmt calls. So, the larger of a string you have, the more you save. And also, the time difference increases as the string size increases.
But as you might have already figured out, this is just optimizing a corner case. Some of the limitations of this approach are:
It is only applicable when you just have a single string and directly printing that. The moment you move to creating a formatted string, you need to call fmt.Sprintf and you deal with the pp buffer pool again.
It is only applicable when you are using the log package to write to an underlying writer. If you are calling the methods of the writer struct directly, then all of this is already taken care of.
It hurts readability too. logger.Println(msg) is certainly much more readable and clear than logger.Output(1, msg).
I only had a couple of cases like this in my code’s hot path. And in top-level benchmarks, they don’t have much of an impact. But in situations, where you have a write-heavy application and a whole lot of plain strings are being written, you might look into using this and see if it gives you any benefit.
This is a recount of an adventure where I experimented with some Go assembly coding in trying to optimize the math.Atan2 function.
Some context
The reason for optimizing the math.Atan2 function is because my current work involves performing some math calculations. And the math.Atan2 call was in the hot path. Now, usually I don’t look beyond trying to optimize what the standard library is already doing, but just for the heck of it, I tried to see if there are any ways in which the calculation can be done faster.
And that led me to this SO link. So, there seems to be an FMA operation which does a fused-multiply-add in a single step. That was very interesting. Looking into Go, I found that this is an open issue which is yet to be implemented in the Go assembler. That means, the Go code is still doing normal multiply-add inside the math.Atan2 call. This seemed like something that can be optimized. Atleast, it was worth a shot to see if there are considerable gains.
But that meant, I have to write an assembly module to be called from Go code.
So it begins …
I started to do some digging. The Go documentation mentions how to add unsupported instructions in a Go assembly module. Essentially, you have to write the opcode for that instruction using a BYTE or WORD directive.
I wanted to start off with something simple. Found a couple of good links here and here. The details of how an assembly module works are not necessary to mention here. The first link explains it pretty well. This will be just about how the FMA instruction was utilized to replace a normal multiply-add.
Anyway, so I copied the simple addition example and got it working. Here is the code for reference -
#include "textflag.h"
TEXT ·add(SB),NOSPLIT,$0
MOVQ x+0(FP), BX
MOVQ y+8(FP), BP
ADDQ BP, BX
MOVQ BX, ret+16(FP)
RET
Note the #include directive. You need that. Otherwise, it does not recognize the NOSPLIT command.
Now, the next target was to convert this into adding float64 variables. Now keep in mind, I am an average programmer whose last brush with assembly was in University in some sketchy course. The following might be simple to some of you but this was me -
After some hit and trial and sifting through some Go code, I got to a working version. Note that, this adds 3 variables instead of 2. This was to prepare the example for the FMA instruction.
TEXT ·add(SB),$0
FMOVD x+0(FP), F0
FMOVD F0, F1
FMOVD y+8(FP), F0
FADDD F1, F0
FMOVD F0, F1
FMOVD z+16(FP), F0
FADDD F1, F0
FMOVD F0, ret+24(FP)
RET
Then I had a brilliant(totally IMO) idea. I could write a simple floating add in Go, do a go tool compile -S, get the generated assembly and copy that instead of handcoding it myself ! This was the result -
Alright, so far so good. Only thing remaining was to add the FMA instruction. Instead of adding the 3 numbers, we just need to multiply the first 2 and add it to the 3rd and return it.
Looking into the documentation, I found that there are several variants of FMA. Essentially there are 2 main categories, which deals with single precision and double precision values. And each category has 3 variants which do a permutation-combination of which arguments to choose, when doing the multiply-add. I went ahead with the double precision one because that’s what we are dealing with here. These are the variants of it -
VFMADD132PD: Multiplies the two or four packed double-precision floating-point values from the first source operand to the two or four packed double-precision floating-point values in the third source operand, adds the infi-nite precision intermediate result to the two or four packed double-precision floating-point values in the second source operand, performs rounding and stores the resulting two or four packed double-precision floating-point values to the destination operand (first source operand).
VFMADD213PD: Multiplies the two or four packed double-precision floating-point values from the second source operand to the two or four packed double-precision floating-point values in the first source operand, adds the infi-nite precision intermediate result to the two or four packed double-precision floating-point values in the third source operand, performs rounding and stores the resulting two or four packed double-precision floating-point values to the destination operand (first source operand).
VFMADD231PD: Multiplies the two or four packed double-precision floating-point values from the second source to the two or four packed double-precision floating-point values in the third source operand, adds the infinite preci-sion intermediate result to the two or four packed double-precision floating-point values in the first source operand, performs rounding and stores the resulting two or four packed double-precision floating-point values to the destination operand (first source operand).
The explanations are copied from the intel reference manual (pg 1483). Basically, the 132, 213, 231 denotes the index of the operand on which the operations are being done. Why there is no 123 is beyond me. I selected the 213 variant because that’s what felt intuitive to me - doing the addition with the last operand.
Ok, so now that the instruction was selected, I needed to get the opcode for this. Believe it or not, here was where everything came to a halt. The intel reference manual and other sites all mention the opcode as VEX.DDS.128.66.0F38.W1 A8 /r and I had no clue what that was supposed to mean. The Go doc link showed that the opcode for EMMS was 0F, 77. So, maybe for VFMADD213PD, it was 0F, 38 ? That didn’t work. And no variations of that worked.
Finally, a breakthrough came with this link. I wrote a file containing this -
BITS 64
VFMADD213PD xmm0, xmm2, xmm3
Saved it as test.asm. Then after a yasm test.asm and xxd test; I got the holy grail - C4E2E9A8C3. Like I said, I had no idea how was it so different than what the documentation said, but nevertheless decided to move on ahead.
Alright, so integrating it within the code. I got this -
Perfect. Now I just need to write my own atan2 implementation with the fma operations replaced with this asm call. I copied all of the code from the standard library for the atan2 function, and replaced the multiply-additions with an fma call. The brunt of the calculation actually happens inside a xatan call.
Did some sanity checks to verify the correctness. Everything looked good. Now time to benchmark and get some sweet perf improvement !
And, here was what I saw -
go test -bench=. -benchmem
BenchmarkAtan2-4 100000000 23.6 ns/op 0 B/op 0 allocs/op
BenchmarkMyAtan2-4 30000000 53.4 ns/op 0 B/op 0 allocs/op
PASS
ok asm 4.051s
The fma implementation was slower, much slower than the normal multiply-add. Trying to get deeper into it, I thought of benchmarking just the pure fma function with a normal native Go multiply-add. This was what I got -
go test -bench=. -benchmem
BenchmarkFMA-4 1000000000 2.72 ns/op 0 B/op 0 allocs/op
BenchmarkNormalMultiplyAdd-4 2000000000 0.38 ns/op 0 B/op 0 allocs/op
PASS
ok asm 3.799s
I knew it! It was the assembly call overhead which was more than the gain I got from the fma calculation. Just to confirm this theory, I did another benchmark where I compared with an assembly implementation of a multiply-add.
go test -bench=. -benchmem -cpu=1
BenchmarkFma 1000000000 2.65 ns/op 0 B/op 0 allocs/op
BenchmarkAsmNormal 1000000000 2.66 ns/op 0 B/op 0 allocs/op
PASS
ok asm 5.866s
Clearly it was the function call overhead. That meant if I implemented the entire xatan function in assembly which had 9 fma calls, there might be a chance that the gain from fma calls were actually more than the loss from the assembly call overhead. Time to put the theory to test.
After a couple of hours of struggling, my full asm xatan implementation was complete. Note that there are 8 fma calls. The last one can also be converted to fma, but I was too eager to find out the results. If it did give any benefit, then it makes sense to optimize further. This was my final xatan implementation in assembly.
funcBenchmarkMyAtan2(b*testing.B){forn:=0;n<b.N;n++{myatan2(-479,123)// same code as standard library, with just the xatan function swapped to the one above}}funcBenchmarkAtan2(b*testing.B){forn:=0;n<b.N;n++{math.Atan2(-479,123)}}
Still slower, but much better this time. I had managed to bring it down from 53.4 ns/op to 25.3ns/op. Note that these are just results from one run. Ideally, good benchmarks should be run several times and viewed through the benchstat tool. But, the point here is that even after writing the entire xatan code in assembly with only one function call it was just comparable enough with the normal atan2 function. That is something not desirable. Until the gains are pretty big enough, it doesn’t make sense to write and maintain an assembly module.
Maybe if someone implements the entire atan2 function in assembly, we might actually see the asm implementation beat the native one. But still I don’t think the gains will be great enough to warrant the cost of writing it in assembly. So until the time issue 8037 is resolved, we will have to make do with whatever we got.
And that’s it !
It was fun to tinker with assembly code. I have much more respect for a compiler now. Sadly, all adventures do not end with a success story. Some adventures are just for the experience