An adventure with whisper, wasi, and wazero

Introduction

It all started after I came across this brilliant article: https://yklcs.com/blog/universal-libs-with-wasm. At my day job, we use the whisper library to transcribe audio calls and generate subtitles. Since our stack is entirely Go based, we use the CGo API to interact with it. However, after reading the article, I had a desperate urge to see whether the same can be done here as well!

The idea was to compile the whisper library to a WASI build, and then load the binary via wazero and then use it. 100% pure Go.

Bear in mind that there isn’t an overall benefit to this exercise. The CGo code can compile to much better native code which can use AVX/AVX2 and SSE3 instruction sets. But all code in the wasm binary has to go via the wasm runtime which is still very primitive. So this exercise was purely to scratch an itch to answer the question - Can it be done?

Changing emscripten to generate wasi

I was fairly relieved to see that wasm support is already there in whisper: https://github.com/ggerganov/whisper.cpp/tree/master/examples/whisper.wasm. That made my starting point a lot easier. All that was needed was to switch from wasm to wasi and then my job would be done! Wishful thinking, obviously.

The first roadblock was that wazero still doesn’t have thread support. So I would need to compile whisper without pthreads. That wasn’t too hard. And then the next step was to target a wasi build instead of wasm. Emscripten, by default, will build a binary that’s meant to be run on the browser. To make it work in a wasi environment, a separate set of flags needed to be passed.

After a bit of trawling through the docs, I came up with this set of changes:

diff --git a/CMakeLists.txt b/CMakeLists.txt
index b6d8aac..504c4d2 100644
--- a/CMakeLists.txt
+++ b/CMakeLists.txt
@@ -338,8 +338,8 @@ else()
         endif()
     else()
         if (EMSCRIPTEN)
-            set(CMAKE_C_FLAGS   "${CMAKE_C_FLAGS}   -pthread")
-            set(CMAKE_CXX_FLAGS "${CMAKE_CXX_FLAGS} -pthread")
+            set(CMAKE_C_FLAGS   "${CMAKE_C_FLAGS}   ")
+            set(CMAKE_CXX_FLAGS "${CMAKE_CXX_FLAGS} ")
         else()
             if(NOT WHISPER_NO_AVX)
                 set(CMAKE_C_FLAGS "${CMAKE_C_FLAGS} -mavx")
diff --git a/examples/whisper.wasm/CMakeLists.txt b/examples/whisper.wasm/CMakeLists.txt
index 75e5a8d..95fef9d 100644
--- a/examples/whisper.wasm/CMakeLists.txt
+++ b/examples/whisper.wasm/CMakeLists.txt
@@ -30,12 +30,14 @@ endif()

 set_target_properties(${TARGET} PROPERTIES LINK_FLAGS " \
     --bind \
-    -s USE_PTHREADS=1 \
-    -s PTHREAD_POOL_SIZE_STRICT=0 \
+    -g \
+    --no-entry \
+    -s STANDALONE_WASM \
+    -s ERROR_ON_UNDEFINED_SYMBOLS=0 \
     -s INITIAL_MEMORY=2000MB \
     -s TOTAL_MEMORY=2000MB \
     -s FORCE_FILESYSTEM=1 \
-    -s EXPORTED_RUNTIME_METHODS=\"['print', 'printErr', 'ccall', 'cwrap']\" \
+    -s EXPORTED_RUNTIME_METHODS=\"['out', 'err', 'ccall', 'cwrap']\" \
     ${EXTRA_FLAGS} \
     ")

This got me a binary that I could load via wazero.

Getting wazero to play with whisper

However, the struggle was just beginning. Now I could load the binary, but was running into this error while trying to initialize the module.

func[wasi_snapshot_preview1.fd_seek]: signature mismatch

GitHub search led me to https://github.com/tetratelabs/wazero/issues/1461 which pointed to some incompatiblity issue with my generated binary. At that time, I didn’t fully understand what was going on, so I just started to generate stub APIs to make the error go away.

One can easily override any import function in the binary with the FunctionExporter interface.

For example:

snpBuilder.NewFunctionBuilder().WithFunc(func(ctx context.Context, p1, p2, p3, p4, p5 int32) int32 {
  log.Printf("fd_seek called-: %d %d %d %d %d", p1, p2, p3, p4, p5)
  return 0
}).Export("fd_seek")

This just turned into a whack-a-mole game where every time I stubbed one function, it failed in another one. Until I realized that stubbing out syscalls like this isn’t actually going to work. I need them to make file access and other internal functionality work. I actually need to fix the signature mismatch from within the binary itself.

I reached out to the author of embind: https://github.com/jerbob92/wazero-emscripten-embind/issues/24 who pointed out to me that it could be due to running an older version of emscripten. And voila! That fixed it.

Getting file access to be working

Now the binary was loading fine, and the module was also instantiating. The problem was loading the model file. Bear in mind that wasi file system access works through a syscall layer which needs to be implemented by the compiler. Turns out that emscripten only has partial support for that. And I specifically needed openat to work. Luckily though, the same author of embind sent a PR which does what I needed: https://github.com/jerbob92/wazero-emscripten-embind/issues/24!

So then it was time to build emscripten locally. And after a while of setting up llvm and other dependencies, I finally got that branch to build. And then used the newly compiled emscripten to compile a new binary. And finally, I was able to load files!

The last hurdle

As always, there’s a boss level in any exercise which takes multiple tries until you break through. This was no different. The last problem here was figuring out the emscripten way to access Go code from C++.

As I mentioned before, emscripten assumes that you are working in a JS environment. Everything is written assuming you are passing JS objects. It gets very tricky trying to make that code work in Go. The first problem I faced was trying to pass the audio data. On the Go side, I had a []float32 slice after decoding the .wav file, but the C++ code assumed a Float32Array which has properties like length and constructor. This is the full file, but the relevant code is:

std::vector<float> pcmf32;
const int n = audio["length"].as<int>();

emscripten::val heap = emscripten::val::module_property("HEAPU8");
emscripten::val memory = heap["buffer"];

pcmf32.resize(n);

emscripten::val memoryView = audio["constructor"].new_(memory, reinterpret_cast<uintptr_t>(pcmf32.data()), n);
memoryView.call<void>("set", audio);

So what it’s basically doing is, getting the length of the audio. And then allocating some memory within the webassembly memory which is the same size as the audio. And finally copying over the audio data to the memory.

Now getting that to work in Go is not without its challenges because essentially you have to mock the runtime into thinking that it’s working with JS, whereas it’s not. But finally, again with a bit of support at https://github.com/jerbob92/wazero-emscripten-embind/pull/25, everything came together at last!

Full repo is here: https://github.com/agnivade/whisper-wasi. Ignore the poor code quality.

Results

system_info: n_threads = 1 / 1 | AVX = 0 | AVX2 = 0 | AVX512 = 0 | FMA = 0 | NEON = 0 | ARM_FMA = 0 | METAL = 0 | F16C = 0 | FP16_VA = 0 | WASM_SIMD = 1 | BLAS = 0 | SSE3 = 0 | SSSE3 = 0 | VSX = 0 | CUDA = 0 | COREML = 0 | OPENVINO = 0 |
operator(): processing 176000 samples, 11.0 sec, 1 threads, 1 processors, lang = en, task = transcribe ...

[00:00:00.000 --> 00:00:10.500]   And so my fellow Americans ask not what your country can do for you, ask what you can do for your country.

whisper_print_timings:     load time =     5.00 ms
whisper_print_timings:     fallbacks =   0 p /   0 h
whisper_print_timings:      mel time =     1.00 ms
whisper_print_timings:   sample time =    51.00 ms /     1 runs (   51.00 ms per run)
whisper_print_timings:   encode time =     1.00 ms /     1 runs (    1.00 ms per run)
whisper_print_timings:   decode time =    25.00 ms /    25 runs (    1.00 ms per run)
whisper_print_timings:   batchd time =     1.00 ms /     3 runs (    0.33 ms per run)
whisper_print_timings:   prompt time =     0.00 ms /     1 runs (    0.00 ms per run)
whisper_print_timings:    total time =   160.00 ms
2023/12/05 12:09:19 /home/agniva/play/agnivade/whisperwasmserve/main.go:125: Processing returned: 0. Time Taken 1m36.880706434s

As you can see, there’s no AVX or SSE support. Just WASM_SIMD. I was curious to run the same file in a single threaded CGo env to see how much of a difference it made:

system_info: n_threads = 1 / 8 | AVX = 1 | AVX2 = 1 | AVX512 = 0 | FMA = 1 | NEON = 0 | ARM_FMA = 0 | METAL = 0 | F16C = 1 | FP16_VA = 0 | WASM_SIMD = 0 | BLAS = 0 | SSE3 = 1 | SSSE3 = 1 | VSX = 0 | CUDA = 0 | COREML = 0 | OPENVINO = 0 |

Loading "/home/agniva/play/whisper.cpp/bindings/go/samples/jfk.wav"
  ...processing "/home/agniva/play/whisper.cpp/bindings/go/samples/jfk.wav"
time taken: 17.219505214s

whisper_print_timings:     load time =   473.24 ms
whisper_print_timings:     fallbacks =   0 p /   0 h
whisper_print_timings:      mel time =    33.56 ms
whisper_print_timings:   sample time =    19.98 ms /     1 runs (   19.98 ms per run)
whisper_print_timings:   encode time = 16281.79 ms /     1 runs (16281.79 ms per run)
whisper_print_timings:   decode time =   883.71 ms /    30 runs (   29.46 ms per run)
whisper_print_timings:   batchd time =     0.00 ms /     1 runs (    0.00 ms per run)
whisper_print_timings:   prompt time =     0.00 ms /     1 runs (    0.00 ms per run)
whisper_print_timings:    total time = 17219.53 ms
[    0s->    8s]  And so, my fellow Americans, ask not what your country can do for you.
[    8s->   11s]  Ask what you can do for your country.

17s vs 90s. The difference is clear. This is a very CPU intensive job. So not taking advantage of native hardware instructions will only get you so far.

Nevertheless, the exercise was still successful. I was able to answer my question. Yes, it can be done. However, the road is bumpy. Support is still very sketchy and though work is being done, it’ll take some time till it matures.

But the idea is worth exploring further, and I’m sure there’ll be a lot of other exciting applications of this concept in the near future. For example, now you can easily use Rust code in your Go project. Or even vice-versa! Any language can be used by any other language as long as it can target the WASI environment.

Hopefully, this post was helpful. I’m curious to know what other applications people come up with. Feel free to shoot me an email or comment in the post.

Encrypting your root partition in-place without reinstalling Ubuntu

Introduction

Last month my workplace enforced the requirement to have our laptop disks to be fully encypted. The only niggle was that I had already been using my laptop for several years and wasn’t terribly looking forward to setting up everything from scratch. I was left with two options:

  1. Set a weekend aside, take a full backup and reinstall everything, along with encryption this time.
  2. Take a braver approach and try to encrypt in-place.

It doesn’t take a genius to figure out that it doesn’t hurt to try #2 first, and then #1 if that fails. So that’s what I did, and was successful with #2. I captured my whole process for posterity. Most of it is from this great guide: https://opencraft.com/tutorial-encrypting-an-existing-root-partition-in-ubuntu-with-dm-crypt-and-luks/ which worked out perfect for me. Except for some minor places which needed modifications.

Following is an account of what happened. This is on an Ubuntu 22.04.2 OS.

Steps

  1. Boot from an Ubuntu live USB.
  2. First, you need to find the device numbers of your partitions. You can run fdisk -l to find them out.

This is how mine looked:

  /dev/nvme0n1p1    2048    1050623   1048576   512M EFI System
  /dev/nvme0n1p2 1050624 1000214527 999163904 476.4G Linux filesystem
  1. Resize your root filesystem
  sudo e2fsck -f /dev/nvme0n1p2 # say yes to optimizing extent trees
  sudo resize2fs -M /dev/nvme0n1p2
  sudo cryptsetup-reencrypt /dev/nvme0n1p2 --new --reduce-device-size 16M --type=luks1
  sudo cryptsetup open /dev/nvme0n1p2 rootfs
  sudo resize2fs /dev/mapper/rootfs
  1. Post-encryption stuff
  sudo mount /dev/mapper/rootfs /mnt
  sudo mount /dev/nvme0n1p1 /mnt/boot/efi
  sudo mount --bind /dev /mnt/dev
  sudo mount --bind /dev/pts /mnt/dev/pts
  sudo mount --bind /sys /mnt/sys
  sudo mount --bind /proc /mnt/proc
  sudo chroot /mnt
  1. Now inside root shell, run these:
  mkdir /etc/luks
  dd if=/dev/urandom of=/etc/luks/boot_os.keyfile bs=4096 count=1
  chmod u=rx,go-rwx /etc/luks
  chmod u=r,go-rwx /etc/luks/boot_os.keyfile
  cryptsetup luksAddKey /dev/nvme0n1p2 /etc/luks/boot_os.keyfile
  1. Find the encrypted UUID for /dev/nvme0n1p2 by running blkid -s UUID -o value /dev/nvme0n1p2. Note it down.

  2. Add the following line to /etc/crypttab:

  rootfs UUID=<UUID from before> /etc/luks/boot_os.keyfile luks,discard
  1. Remove the existing root partition line from /etc/fstab and add the following line:
  /dev/mapper/rootfs / ext4 errors=remount-ro 0 1
  1. In /etc/default/grub, remove the existing reference to the root partition from GRUB_CMDLINE_LINUX and add the following line:
  GRUB_ENABLE_CRYPTODISK=y
  1. Then run:
  grub-install
  update-grub
  1. Make sure that the GRUB configuration file at /boot/grub/grub.cfg was updated correctly by update-grub. In “menuentry Ubuntu”, there should be atleast insmod cryptodisk, and insmod luks

  2. Set the KEYFILE_PATTERN in /etc/cryptsetup-initramfs/conf-hook to KEYFILE_PATTERN="/etc/boot/*.keyfile". (You can also set the umask if you want)

  3. Then run:

  update-initramfs -k all -c
  exit
  umount -a

Then remove the USB drive, and reboot your computer. Now you will be prompted to type the passphrase at boot. Enter that and Ubuntu will boot!

Hopefully that was helpful. Note that all of this was done in Ubuntu 22.04.2. It might change in the later versions. Please feel free to comment in there’s something that needs to change and I’d be glad to update them.

Performance cliffs with MySQL compound indexes

In this post, I’d like to take you through a curious case of a MySQL performance regression that happened due to changing an index from a single column to a two column index.

Introduction

It always starts out the same way - someone complaining that a query is running very slowly on their system. This was no different. As the first step to debug any slow query, I asked the user to show the EXPLAIN output.

Before we analyze the output, let’s look at the schema of the table and the indexes that it has:

CREATE TABLE `Posts` (
  `Id` varchar(26) NOT NULL,
  `CreateAt` bigint(20) DEFAULT NULL,
  `UpdateAt` bigint(20) DEFAULT NULL,
  `DeleteAt` bigint(20) DEFAULT NULL,
  `UserId` varchar(26) DEFAULT NULL,
  `ChannelId` varchar(26) DEFAULT NULL,
  `RootId` varchar(26) DEFAULT NULL,
  `Message` text,
  `Type` varchar(26) DEFAULT NULL,
  PRIMARY KEY (`Id`),
  KEY `idx_posts_update_at` (`UpdateAt`),
  KEY `idx_posts_create_at` (`CreateAt`),
  KEY `idx_posts_delete_at` (`DeleteAt`),
  KEY `idx_posts_channel_id_update_at` (`ChannelId`,`UpdateAt`),
  KEY `idx_posts_channel_id_delete_at_create_at` (`ChannelId`,`DeleteAt`,`CreateAt`),
  KEY `idx_posts_root_id_delete_at` (`RootId`,`DeleteAt`),
) ENGINE=InnoDB DEFAULT CHARSET=utf8mb4 |

The above is a simplified representation of the actual Posts table, but it is sufficient for our purposes to understand the problem. It has some very basic columns like a random Id which serves as the primary key, and most of the other columns are self-explanatory.

Now let’s take a look at the EXPLAIN output from the user:

mysql> explain UPDATE Posts SET DeleteAt = 1637998911684, UpdateAt = 1637998911684, Props = JSON_SET(Props, '$.deleteBy', 'buqskqrwmjnhfuqskqrwmjn4ca') Where Id = 'c3gazo74m3rkjps71qbtso6twc' OR RootId = 'c3gazo74m3rkjps71qbtso6twc';
+----+-------------+-------+------------+-------------+-------------------------------------+-------------------------------------+---------+------+------+----------+-------------------------------------------------------------------------------------+
| id | select_type | table | partitions | type        | possible_keys                       | key                                 | key_len | ref  | rows | filtered | Extra                                                                               |
+----+-------------+-------+------------+-------------+-------------------------------------+-------------------------------------+---------+------+------+----------+-------------------------------------------------------------------------------------+
|  1 | UPDATE      | Posts | NULL       | index_merge | PRIMARY,idx_posts_root_id_delete_at | idx_posts_root_id_delete_at,PRIMARY | 107,106 | NULL |    2 |   100.00 | Using sort_union(idx_posts_root_id_delete_at,PRIMARY); Using where; Using temporary |
+----+-------------+-------+------------+-------------+-------------------------------------+-------------------------------------+---------+------+------+----------+-------------------------------------------------------------------------------------+
1 row in set, 1 warning (0.00 sec)

I have been scarred in the past by index_merge optimizations, so the moment I saw the word index_merge, alarm bells started to ring. But it would turn out that, this was a rather peculiar case.

Let’s simplify the query further into its very essential bits:

UPDATE Posts
SET SomeCol = ?
Where Id = 'id' OR RootId = 'id';

That’s all there is. We are setting the value of a column(or columns) depending on a match of either the Id or the RootId column. The query is doing an:

  1. index_merge. (This is a merge of two index scans)
  2. sort_union(idx_posts_root_id_delete_at,PRIMARY) (It performs a union of the two scans and sorts the results)
  3. temporary table sort. (The sorting is performed via temporary tables)

Analysis

Given that this was a regression, we tried to look back at what changed. Originally there was just a one column index on RootId. Based on some performance tests, we expanded that index to cover RootId and DeleteAt as well. So theoretically speaking, any query using just the RootId column should be unaffected by this change. Unfortunately, this assumption turned out to be wrong.

This was what we were seeing in the original query:

mysql> EXPLAIN UPDATE Posts SET DeleteAt = 1637998911687 Where Id = 'q38uaydtpink5f4wkmcsn8h47o' OR RootId = 'q38uaydtpink5f4wkmcsn8h47o';
*************************** 1. row ***************************
           id: 1
  select_type: UPDATE
        table: Posts
   partitions: NULL
         type: index_merge <------
possible_keys: PRIMARY,idx_posts_root_id
          key: PRIMARY,idx_posts_root_id
      key_len: 106,107
          ref: NULL
         rows: 9
     filtered: 100.00
        Extra: Using union(PRIMARY,idx_posts_root_id); Using where <------
1 row in set, 1 warning (0.00 sec)


mysql> UPDATE Posts SET DeleteAt = 1637998911687, UpdateAt = 1637998911687, Props = JSON_SET(Props, '$.deleteBy', 'buqskqrwmjnhfuqskqrwmjn4ca') Where Id = 'q38uaydtpink5f4wkmcsn8h47o' OR RootId = 'q38uaydtpink5f4wkmcsn8h47o'\G
Query OK, 0 rows affected (0.01 sec) <------

We can see that the original query uses index_merge as well, but there is a difference. Instead of a sort_union, it does a union and there is no temporary sort. According the MySQL documentation, sort_union is applied when the conditions to satisy union is there, but union cannot be applied. And additionally, in sort_union you would also need to sort the results, which was happening by a sort via temporary tables. This was essentially killing the query performance.

The question was - why was adding a compound index changing the query plan from union to sort_union? And even more importantly, how to fix it?

Our first task was to reproduce this in-house, and we could see it very clearly:

mysql> EXPLAIN UPDATE Posts SET DeleteAt = 1637998911687 Where Id = 'q38uaydtpink5f4wkmcsn8h47o' OR RootId = 'q38uaydtpink5f4wkmcsn8h47o'\G
*************************** 1. row ***************************
           id: 1
  select_type: UPDATE
        table: Posts
   partitions: NULL
         type: index_merge <------
possible_keys: PRIMARY,idx_posts_root_id_delete_at
          key: idx_posts_root_id_delete_at,PRIMARY
      key_len: 107,106
          ref: NULL
         rows: 9
     filtered: 100.00
        Extra: Using sort_union(idx_posts_root_id_delete_at,PRIMARY); Using where; Using temporary <------
1 row in set, 1 warning (0.00 sec)


mysql> UPDATE Posts SET DeleteAt = 1637998911687, UpdateAt = 1637998911687, Props = JSON_SET(Props, '$.deleteBy', 'buqskqrwmjnhfuqskqrwmjn4ca') Where Id = 'q38uaydtpink5f4wkmcsn8h47o' OR RootId = 'q38uaydtpink5f4wkmcsn8h47o'\G
Query OK, 9 rows affected (17.20 sec)
Rows matched: 10  Changed: 9  Warnings: 0 <------

With the repro out of the way, the first thing we tried was to use some very blunt instruments - forcing a specific index. That didn’t work out well.

mysql> EXPLAIN UPDATE Posts FORCE INDEX(PRIMARY) SET DeleteAt = 1637998911687 Where Id = 'q38uaydtpink5f4wkmcsn8h47o' OR RootId = 'q38uaydtpink5f4wkmcsn8h47o'\G
*************************** 1. row ***************************
           id: 1
  select_type: UPDATE
        table: Posts
   partitions: NULL
         type: index <------
possible_keys: NULL
          key: PRIMARY
      key_len: 106
          ref: NULL
         rows: 11293819
     filtered: 100.00
        Extra: Using where
1 row in set, 1 warning (0.00 sec)


mysql> UPDATE Posts FORCE INDEX(PRIMARY) SET DeleteAt = 1637998911687, UpdateAt = 1637998911687, Props = JSON_SET(Props, '$.deleteBy', 'buqskqrwmjnhfuqskqrwmjn4ca') Where Id = 'q38uaydtpink5f4wkmcsn8h47o' OR Root
Query OK, 0 rows affected (17.10 sec) <------

No improvement. Query time is same at 17 seconds as earlier.

After some digging, we found a peculiar optimization called the ORDER BY optimization.

In some cases, MySQL may use an index to satisfy an ORDER BY clause and avoid the extra sorting involved in performing a filesort operation.

And this turned out to be that case. Simply adding an ORDER BY Id to the UPDATE query did the trick.

mysql> EXPLAIN UPDATE Posts SET DeleteAt = 1637998911686 Where Id = 'q38uaydtpink5f4wkmcsn8h47o' OR RootId = 'q38uaydtpink5f4wkmcsn8h47o' ORDER BY Id\G
*************************** 1. row ***************************
           id: 1
  select_type: UPDATE
        table: Posts
   partitions: NULL
         type: index_merge <------
possible_keys: PRIMARY,idx_posts_root_id_delete_at
          key: idx_posts_root_id_delete_at,PRIMARY
      key_len: 107,106
          ref: NULL
         rows: 9
     filtered: 100.00
        Extra: Using sort_union(idx_posts_root_id_delete_at,PRIMARY); Using where; Using filesort <------
1 row in set, 1 warning (0.00 sec)


mysql> UPDATE Posts SET DeleteAt = 1637998911686, UpdateAt = 1637998911686, Props = JSON_SET(Props, '$.deleteBy', 'buqskqrwmjnhfuqskqrwmjn4ca') Where Id = 'q38uaydtpink5f4wkmcsn8h47o' OR RootId = 'q38uaydtpink5f4wkmcsn8h47o' ORDER BY Id;
Query OK, 9 rows affected (0.01 sec)

Compare this to the earlier output:

Using sort_union(idx_posts_root_id_delete_at,PRIMARY); Using where; Using temporary

versus

Using sort_union(idx_posts_root_id_delete_at,PRIMARY); Using where; Using filesort

Only a difference between filesort and temporary sort changes the query time from 17s to 0.01s. An important thing to note is that filesort doesn’t always mean the sort happens on-disk. As outlined here:

A filesort operation uses temporary disk files as necessary if the result set is too large to fit in memory. Some types of queries are particularly suited to completely in-memory filesort operations.

Conclusion

There you have it. We made the changes and performance immediately went back to normal. To recap, here are the events that happened:

  1. We had an index on a single column(col1). Original query did an index_merge union.
  2. We expanded that index to (col1+col2).
  3. The query plan changes to index_merge sort_union with temporary table sort.
  4. The fix was to add an ORDER BY clause at the end to change it to filesort.

This still leaves the original question unanswered. Why is MySQL doing a sort_union instead of a union? I’d be very curious to hear if anyone has any thoughts on this.

Meanwhile, Postgres handles all of this perfectly.

A visual explanation of the PGM Index

Few months back, a HN post about learned indexes caught my attention. 83x less space with the same performance as a B-tree? What sort of magic trick is this?! And why isn’t everybody else using it if it’s so good?

I decided to spend some time reading the paper to really understand what’s going on. Now reading a scientific paper is a daunting endeavour as most of it is written in small text, decorated with magical Greek symbols, with little to no diagrams for us lay people. But this is really a beautiful piece of data structure which deserves to be used more widely in other systems, rather than just languish in academic circles.

So if you have been putting off from reading it, this post is my attempt at a simplified explanation of what is in the paper. No mathematical symbols. No equations. Just the basic idea of how it works.

What is an index

Let’s consider an array of sorted integers. We want to calculate the predecessor of x; i.e. given x, find out the largest integer in the array lesser than or equal to x. For example, if our array is {2,8,10,18,20}, predecessor(15) would be 10, and predecessor(20) would be 20. An extension of this would be the range(x, y) function, which would give us the set of integers lying within the range of x and y. Any data structure satisfying these requirements can be essentially considered as an index.

If we go through existing categories of data structures:

  • Hash-based ones can only be used to “lookup” the position of a key.
  • Bitmap-based indexes can be expensive to store, maintain and decompress.
  • Trie-based indexes are mostly pointer based, and therefore take up space proportional to the data set.

Which brings us to B-tree based indexes and its variants being the go-to choice for such operations, and is widely used in all databases.

What is a learned index

In a learned index, the key idea is that indexes can be trained to “learn” this predecessor function. Naturally, the first thing that comes to mind is Machine Learning. And indeed, some implementation have used ML to learn this mapping of key to array position within an error approximation.

But unlike those, the PGM index is a fully dynamic, learned index, without any machine learning, that provides a maximum error tolerance and takes smaller space.

PGM Index

PGM means “piece-wise geometric model”. It attempts to create line segments that fit the key distribution in a cartesian plane. We call this a linear approximation. And it’s called “piece-wise” because a single line segment may not be able to express the entire set of keys, within a given error margin. Essentially, it’s a “piece-wise linear approximation” model. If all that sounds complicated, it really isn’t. Let’s take an example.

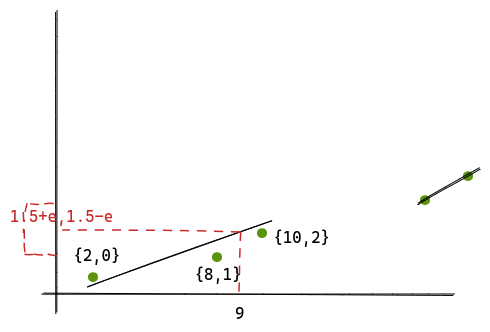
Consider the input data of {2,8,10,18,20} that we had earlier. Let’s plot these in a graph with the keys in the x-axis and array positions in the y-axis.

basic graph

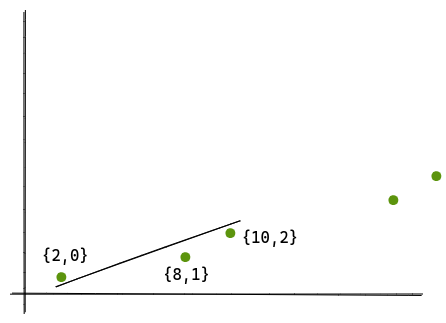
Now, we can see that we can express a set of points that are more or less linear, as a single line segment. Let’s draw a line for the points {2,0}, {8,1}, {10,2}.

line

So any value lying within [2,10] can be mapped with this line. For example, let’s try to find predecessor(9). We take 9 to be the value of x and plot the value of y.

point

Once we get y, the algorithm guarantees that the actual value will lie within a range of {-e, +e}. And if we just do a binary search within a space of 2e + 1, we get our desired position.

That’s all there is to it. Instead of storing the keys, we are just storing the slopes and intercepts, which is completely unrelated to the size of the data, but more dependent on the shape of it. The more random the data is, we need more line segments to express it. And on the other extreme, a set like {1,2,3,4} can be expressed with a single line with zero error.

But this leads to another problem. Once we have a set of line segments, each line segment only covers a portion of our entire key space. Given any random key, how do we know which line segment to use? It’s simple. We run the same algorithm again!

  • Construction

Let’s run through an example and see how do we build up the entire index. Assume our data set is {2, 12, 15, 18, 23, 24, 29, 31, 34, 36, 38, 48}. And error is e.

The algorithm to construct the index is as follows:

  1. We take each point from our set of {k, pos(k)}, and incrementally construct a convex hull from those points.
  2. At every iteration, we construct a bounding rectangle from the convex hull. This is a well-known computational geometry problem, of which there are several solutions. One of them is called Rotating Callipers.
  3. As long as the height of the bounding rectangle is not more than 2e, we keep adding points to the hull.
  4. When the height exceeds 2e, we stop our process, and construct a line segment joining the midpoints of the two arms of the rectangle.
  5. We store the first point in the set, the slope and intercept of the line segment, and repeat the whole process again.

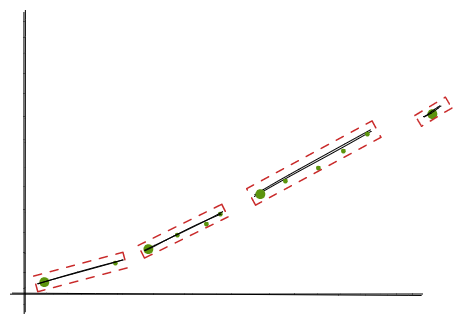
At the end, we will get an array of tuples of (point, slope, intercept).

demo first_pass

Now let’s wipe all the remaining points except the ones from the tuples and run the same algorithm again.

demo second_pass

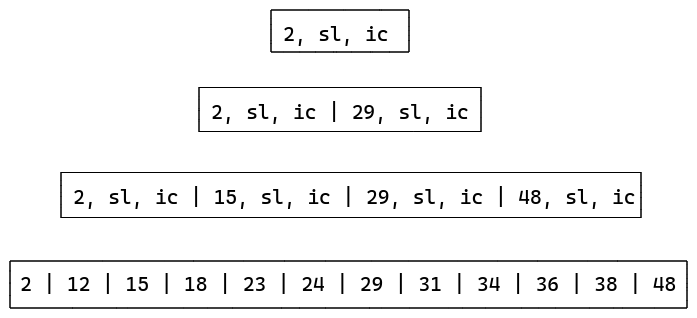
We see that each time, we get an array of decreasing size until we just have a root element. The in-memory representation becomes something like this:

In-memory representation

  • Search

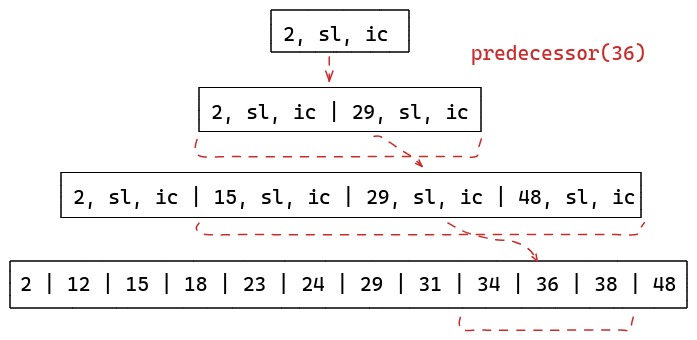
The algorithm to search for a value is as follows:

  1. We start with the root tuple of the index and compute the result of y = k * sl + ic, for an input value of k.
  2. A lower bound lo is calculated to be y-e and a similar upper bound hi as y+e.
  3. We search in the next array in A[lo:hi] to find the rightmost element such that A[i].key <= k
  4. Once an element is found, the whole algorithm is repeated again to calculate y of that node, and search in the next array.
  5. This continues until we reach the original array, and we find our target position.

Search path

The paper proves that the number of tuples (m) for the last level will always be less than n/2e. Since this also holds true for the upper levels, it means that a PGM index cannot be worse than a 2e way B-tree. Because if at every level, we do a binary search within 2e +1, our worst case time complexity is O(log(m) + log(e)). However, in practice, a PGM index is seen to be much faster than a B-tree because m is usually far lower than n.

  • Addition/Removal

Insertions and deletions in a PGM index are slightly tricker compared to traditional indexes. That is because a single tuple could index a variable and potentially large subset of data, which makes the classic B-tree node split and merge algorithms inapplicable. The paper proposes two approaches to handle updates, one customized for append-only data structures like time-series data. Another for general random update scenarios.

In an append-only scenario, the key is first added to the last tuple. If this does not exceeed e threshold, the process stops. If it does exceed, we create a new tuple with the key, and continue the process with the last tuple of the upper layer. This continues until we find a layer where adding the key remains within the threshold. If this continues till the root node, it gets split into two nodes, and a new root node gets created above that.

For inserts that happen in arbitrary positions, it gets slightly more complicated. In this case, we have to maintain multiple PGM indexes built over sets of keys. These sets are either empty or have size 20, 21 .. 2b where b = O(log(n)). Now each insert of a key k finds the first empty set, and builds a new PGM index from all the previous sets including the key k, and then the previous sets are emptied. Let’s take an example. Assume we are starting from scratch and we want to insert 3,8,1,6,9 in the index.

  1. Since everything is empty, we find our first set S0 and insert 3. So our PGM looks like

     S0 = [3]
    
  2. Now the next empty set is S1, because S0 is non-empty. So we take 3 from the last set, and add 8 to S1. S0 is emptied.

     S0 = []
     S1 = [3,8]
    
  3. Our next key is 1. The first empty set is S0. We just add 1 to S0 and move on.

     S0 = [1]
     S1 = [3,8]
    
  4. Both S0 and S1 are non-empty now. So we move to S2, and empty S0 and S1.

     S0 = []
     S1 = []
     S2 = [1,3,6,8]
    
  5. Again, the first empty set is S0. So 9 goes in it.

     S0 = [9]
     S1 = []
     S2 = [1,3,6,8]
    

The deletion of a key d is handled similar to an insert by adding a special tombstone value that indicates the logical removal of d.

Conclusion

And that was a very basic overview of the PGM index. There are further variants of this, fully described in detail in the paper. The successor from this is a Compressed PGM index which compresses the tuples. Then we have a Distribution-aware PGM index which adapts itself not only to the key distribution, but also to the distribution of queries. This is desirable in cases where it’s important to have more frequent queries respond faster than rare ones. Finally, we have a Multi-criteria PGM index that can be tuned to either optimize for time or optimize for space.

I have also created a port of the algorithm in Go here to understand the algorithm better. It’s just a prototype, and suffers from minor approximation issues. For a production-ready library, refer to the author’s C++ implementation here.

Lastly, I would like to thank Giorgio for taking the time to explain some aspects of the paper which I found hard to follow. His guidance has been a indispensable part in my understanding of the paper.

Links:

Setting up gopls with Sublime Text

If you are a Sublime Text user, and looking to set up gopls integration with it, you have arrived at the right place. The primary documentation for gopls assumes you are using VSCode; and the rest are using GoLand, which leaves us Sublime Text users in a tight spot. This post attempts to fill that gap.

The official documentation here just mentions how to install gopls, which is barely enough. But for the sake of completeness, I will go through the entire set of steps.

Installation

  1. Install gopls on your machine.
    • Go to any temp directory and run go get golang.org/x/tools/gopls@latest.
    • If you see the error go: cannot use path@version syntax in GOPATH mode, then run GO111MODULE=on go get golang.org/x/tools/gopls@latest
    • Check that the gopls binary got installed by running which gopls.
  2. Open the Command Pallete (Shift+Ctrl+p). Select “Install Package”
  3. Select “LSP”.
  4. Open the Command Pallete again.
  5. Select “LSP: Enable Language Server Globally”.
  6. Select “gopls”.

This completes the installation part, which is half the battle. Next up, we need to configure gopls.

Configuration

  1. Navigate to Preferences > Package Settings > LSP > Settings. In the User settings section, paste this:

     {
         "clients":
         {
             "gopls":
             {
                 "command": ["/home/agniva/go/bin/gopls"],
                 "enabled": true,
                 "env": {
                     "PATH": "/home/agniva/go/bin:/usr/local/go/bin"
                 },
                 "scopes":["source.go"],
                 "syntaxes": [
                     "Packages/Go/Go.sublime-syntax",
                 ],
                 "settings": {
                     "gopls.usePlaceholders": true,
                     "gopls.completeUnimported": true,
                 },
                 "languageId": "go"
             }
         },
         "only_show_lsp_completions": true,
         "show_references_in_quick_panel": true,
         "log_debug": true,
         "log_stderr": true
     }
    

    Adjust the file paths accordingly.

  2. There are several things to note here. Depending on your shell settings, you may need to pass the full file path. Otherwise, you might see the error “Could not start gopls. I/O timeout.”

  3. Any custom settings need to be placed under the settings key. And the key names need to be prefixed with “gopls.”. For the full list of settings, check here.

  4. Navigate to Preferences > Package Settings > LSP > Key Bindings. You will see that a lot of commands have keymap as “UNBOUND”. Set them as per your old shortcuts.

  5. Open the Command Pallete. Select “LSP: Restart Servers”.

  6. Enjoy a working setup of gopls.

Hopefully this was helpful. As always, please feel free to suggest any improvements in the comments.