
Go has had WebAssembly (wasm) support for a while now, but the tooling is still in it’s nascent stages. It is straightforward to build a wasm module from Go code, but running tests in a browser is still cumbersome, as it requires some HTML and JS glue to work, and generating a CPU profile isn’t even possible since wasm does not have thread support (yet).
I wrote a tool wasmbrowsertest which automates the running of tests in a browser and adds the ability to take a CPU profile. The idea is to compile the test into a binary and spin up a web server to serve the required HTML and JS to run the test. Then we use the Chrome Devtools Protocol to start a headless browser and load the web page. Finally, the console logs are captured and relayed to the command line.
This takes care of running the tests. But this post is about how to generate and analyze CPU profiles in WebAssembly natively, using the Go toolchain. Before I proceed, I should clarify that the following was done in a Chromium-based browser since it needs to work with the Chrome Devtools Protocol. The footnotes section explains why Selenium wasn’t used.
The problem
The developer tools in Google Chrome can take CPU Profiles of any webpage. This allows us to get a profile while the wasm test is running in the browser. But unfortunately, this profile has its own format, and the Go toolchain works with the pprof format. To make this work natively in Go, we need to convert the profile from this devtools format to the pprof format.
What is a profile
At a very basic level, a profile is just a set of samples, where each sample contains a stack frame. The difference in various profile formats lie in how all of it is represented on disk. Let us look into how this is represented in the devtools format, and then we will go over how to convert it to the pprof format.
CDP Profile
A CDP (Chrome Devtools Protocol) profile is represented in a json format with the following top-level keys:
{
	"startTime": ..., // Start time of the profile in us
	"endTime": ..., // End time of the profile in us.
	"nodes": [{...}, {...}, ...],
	"samples": [1,2,1,1],
	"timeDeltas": [...,...], // Time interval between consecutive samples in us.
}
nodes is a list of profile nodes. A node is a single function call site containing information about the function name, line number, and the script it was called from. It also has it’s own unique ID. And a list of child IDs, which are IDs of the respective child nodes.
samples represents the samples taken during a profile. It is a list of node IDs, where each ID points to the leaf node of a stack frame.
To represent it in a diagram:
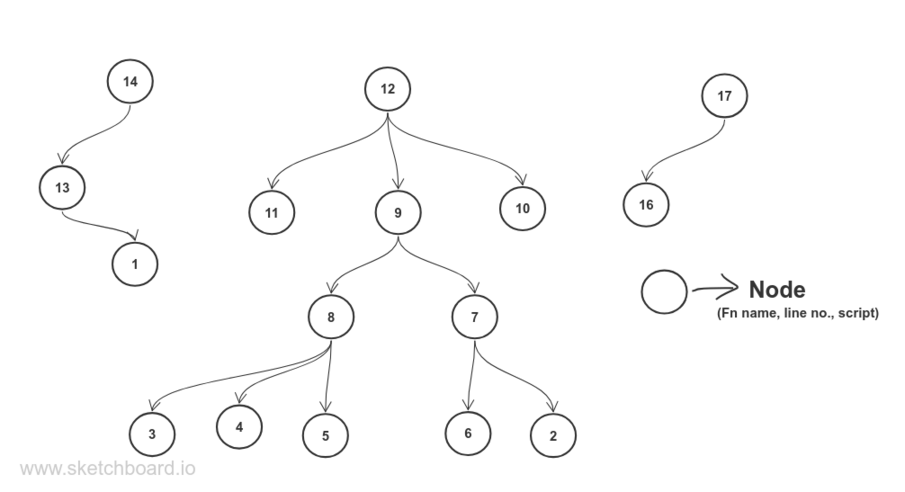
For node 12- 9,10 and 11 are its child IDs.
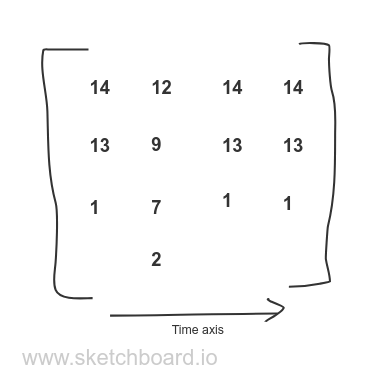
From our samples array above, we have 1,2,1,1 as samples. So, in terms of a list of stack frames, it becomes
PProf Profile
A pprof profile is a proto file which is serialized and stored on disk in a gzip-compressed format. Now, a profile for code running natively on a machine will contain extra information regarding the memory address space locations and other stuff. But since our chrome profile runs inside a browser, we do not have access to such low-level details, and hence our converted profile will not have all the features of a proper pprof profile.
At a high level, a pprof profile has:
type Profile struct {
	Sample            []*Sample
	Location          []*Location
	Function          []*Function

	TimeNanos     int64
	DurationNanos int64
}

type Sample struct {
	Location []*Location
}

type Location struct {
	ID       uint64
	Line     []Line
}

type Line struct {
	Function *Function
	Line     int64
}

type Function struct {
	ID         uint64
	Name       string
	Filename   string
}
Essentially, a profile contains a list of samples. And each sample contains a list of locations. Each location contains a function object along with it’s line number (for simplicity’s sake, we will consider each location to have a single line). Lastly, a function object just has the function name and the file name from where it was called.
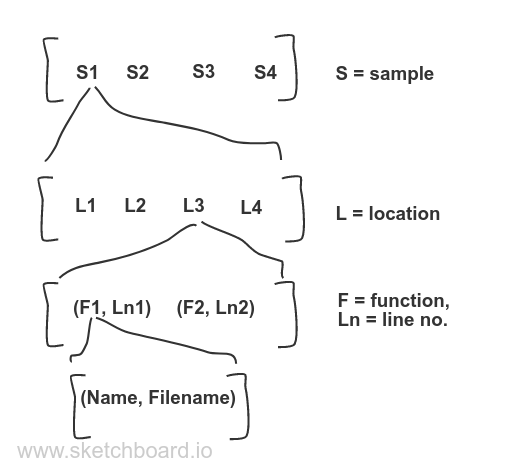
It is a flat representation where the hierarchy is maintained by pointers. So, to construct such a profile, we need to create it from the bottom up- i.e. first we need to construct the list of functions, then locations and then samples.
Converting Devtools to Pprof
To quickly recap what we are trying to achieve here: we have a devtools profile in a json format, and we want to convert it to a pprof format like the struct mentioned above. The TimeNanos and DurationNanos are simple and can be directly set. To create the Function and Location slices, we just need to iterate through the nodes array. As a quick reminder: a node is a single function call site containing information about the function name, line number, and the script it was called from, along with it’s own unique ID.
Note that the node ID is for the node and does not guarantee that different nodes will have different callframes. So we need to create a unique key that we can use to uniquely identify functions. Let that key be - FunctionName + strconv.Itoa(int(LineNumber)) + strconv.Itoa(int(ColumnNumber)) (we get these fields from the callframe object). And for every new instance of a Function, we will use a monotonically increasing uint64 as the function ID. For the location ID, we can directly use the node ID.
So with that, we can get the slice of Functions and since we have the line number too inside the callframe, we can create the Location slice also.
But before we construct the Sample information, we need to create the stack frame of each sample. That information is not directly present in the profile, but we can generate it.
We have the list of children of each node. From this, we can construct the inverse relation where we know what is the parent of each node. Let’s have a map from a nodeID to a struct, containing the pointer to a node and also its parent. Then we can iterate the samples list again and for each child of a node, we point the child to the current node. This will complete all the connections where each node points to its parent.
This is a simplified code snippet which shows what is being done.
// locMeta is a wrapper around profile.Location with an extra
// pointer towards its parent node.
type locMeta struct {
	loc    *profile.Location
	parent *profile.Location
}

// We need to map the nodeID to a struct pointing to the node
// and its parent.
locMap := make(map[int64]locMeta)
// A map to uniquely identify a Function.
fnMap := make(map[string]*profile.Function)
// A monotonically increasing function ID.
// We bump this everytime we see a new function.
var fnID uint64 = 1

for _, n := range prof.Nodes {
	cf := n.CallFrame
	fnKey := cf.FunctionName + strconv.Itoa(int(cf.LineNumber)) + strconv.Itoa(int(cf.ColumnNumber))
	pFn, exists := fnMap[fnKey]
	if !exists {
		// Add to Function slice.
		pFn = &profile.Function{
			ID:         fnID,
			Name:       cf.FunctionName,
			SystemName: cf.FunctionName,
			Filename:   cf.URL,
		}
		pProf.Function = append(pProf.Function, pFn)

		fnID++

		// Add it to map
		fnMap[fnKey] = pFn
	}

	// Add to Location slice.
	loc := &profile.Location{
		ID: uint64(n.ID),
		Line: []profile.Line{
			Function: pFn,
			Line:     cf.LineNumber,
		},
	}
	pProf.Function = append(pProf.Function, loc)

	// Populating the loc field of the locMap
	locMap[n.ID] = locMeta{loc: loc}
}

// We need to iterate once more to build the parent-child chain.
for _, n := range prof.Nodes {
	parent := locMap[n.ID]
	// Visit each child node, get the node pointer from the map,
	// and set the parent pointer to the parent node.
	for _, childID := range n.Children {
		child := locMap[childID]
		child.parent = parent.loc
		locMap[childID] = child
	}
}
Once we have that, we can just iterate over samples array and consult our locMap to get the leaf node and from there walk up the chain to get the entire call stack.
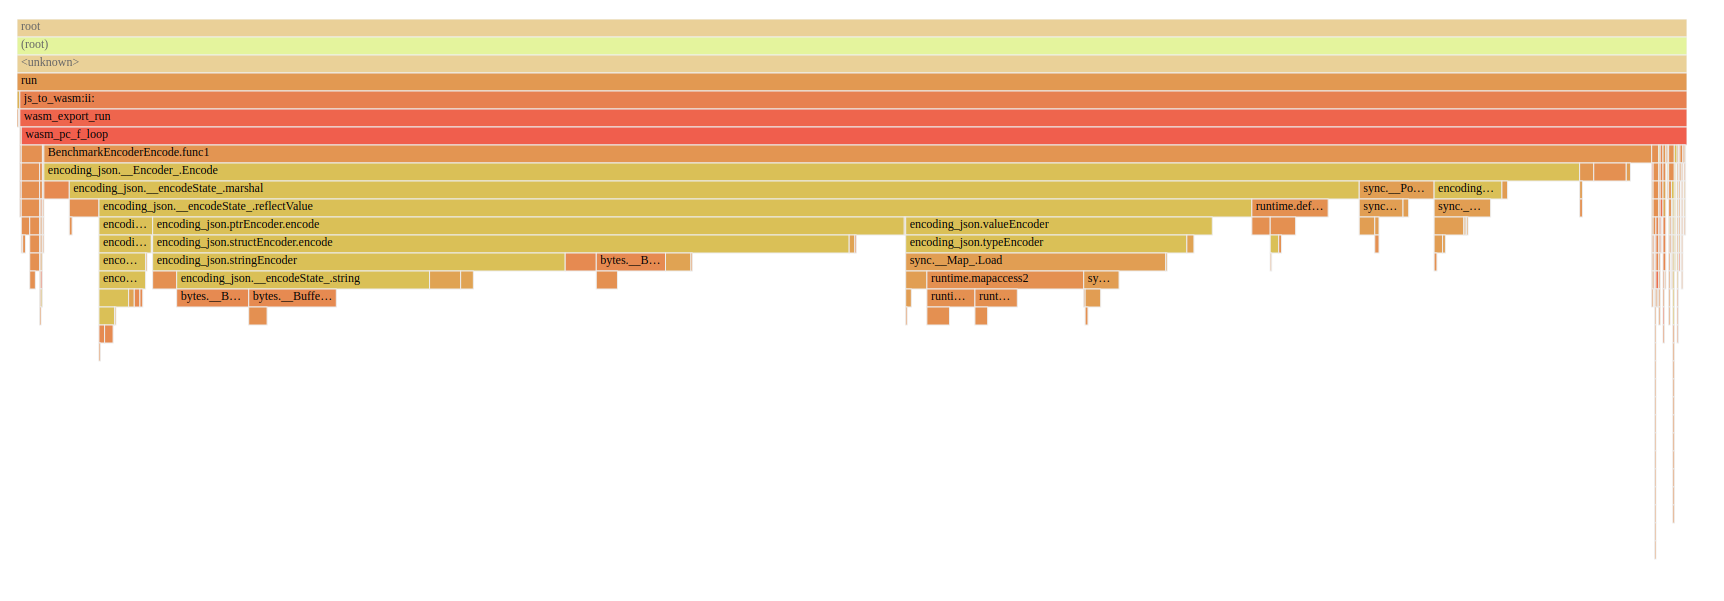
Finally, we now have our Samples, Location and Function slices along with other minor details which I have omitted. Using this, once we have the profile, we can simply run go tool pprof sample.prof and look at the call graph or the flame graph.
Here is an example of a profile taken for the encoding/json package’s EncoderEncode benchmark.
The SVG call graph
The Flame graph-
Please feel free to check the github repo to see the full source code.
Footnotes
- The initial idea was to use a Selenium API and drive any browser to run the tests. But unfortunately, geckodriver does not support the ability to capture console logs - https://github.com/mozilla/geckodriver/issues/284. Hence, the shift to use the ChromeDP protocol circumvents the need to have any external driver binary and just have a browser installed in the machine.
- Unfortunately, all of this will be moot once WebAssembly has thread support (which is already in an experimental phase). Nevertheless, I hope this post shed some light into how profiles are generated !
- A big shoutout to Alexei Filippov from the Chrome Devtools team to help me understand some aspects of a CDP profile.
